Progress has been slowed by the holidays and the lousy weather. But I did get in a call to Shelby Isham at Tnwings yesterday. We had a pleasant conversation. The new upholstery and carpet has been ordered and should be on its way here sometime next week.
I am still battling paint issues on the overlays, specifically, the right side overlay. I sanded down the orange peel and re-painted. However, I didn't really get the paint properly feathered and will need to re-do, again. Which is OK, because it orange-peeled ... again. I gotta figure out why.
Wednesday, December 31, 2008
Thursday, December 25, 2008
Christmas Report
Progress has been slowed by family events, work and the weather. I have been working on the dry transfer lettering on the overlays. The process is fussy and difficult with a steep learning curve. I am closing in on it and hope to have the overlays completed tomorrow, but we shall see.
The weather here in the Pacific Northwest has been frightful. I understand that some New England folks may not think of 20" of snow as much of a big deal. But we are not used to it. Snow "storms" around here usually dump 3-6" and hang around for a couple of days. This series of storms has blanketed the area with 15-24" and has lasted a couple of weeks.
I went up to the airport a couple of days ago. I had too. I had hidden my wife's Christmas present in the hangar (it seemed a good idea at the time). The snow was knee deep between the hangars and was blown up against the doors. For a bit I wasn't sure I would be able to get the hangar doors open. Getting there had been a chore as well. The access gate was inoperative, so I had to enter at the FBO and slog through the snow to the hangar. Fortunately, the main taxi-ways have been plowed, which cut down on the slog, but gave me the opportunity to fall on my butt!
Friday, December 19, 2008
Prop
I received a call from the propeller folks. There were no major issues. The prop is on its way back overhauled, repitched and painted.
The dry transfer process I am using for the lettering on the overlays is proving to be a bit involved. However, I woke up at 0130 this morning with a flash of brilliance that explains my difficulties.
The dry transfer process I am using for the lettering on the overlays is proving to be a bit involved. However, I woke up at 0130 this morning with a flash of brilliance that explains my difficulties.
Thursday, December 18, 2008
PROGRESS
A few things have been accomplished since December 10. First, on December 12, the propeller went to Aircraft Propeller Repair Services in Troutdale, Oregon. It was a miserable day and I couldn't find anyone who wanted to fly down, so I drove it down there. The gracious folks there took an initial look at the prop. They were concerned about some corrosion in the hub area. I haven't heard from them yet, which gives me hope that the corrosion turns out to be a non-issue. They will overhaul the prop and re-pitch to 46" from the current 50".
The re-pitch will mean I will no longer have the fastest 150 on the block. With the 50" prop Juliet would cruise at 118 mph at 2500 rpm. After burning off a bit of fuel, I often had to throttle back to 2450 to stay below the yellow arc on the airspeed indicator. But climb performance was nothing short of miserable. Since almost all of my flying is over short distances, and I favor the smaller airfields, the improved climb performance will be very welcome, and I don't think I will miss the higher cruise speeds. I hope it will also mean I can climb out of Sanderson on a warm (not hot) day with two people and full fuel aboard.
During the return trip I learned that my very good friend, Hollister Young, had passed away. It was difficult to weep and drive at the same time. I pulled over and composed myself before continuing my trip home. I spent quite a few pleasant hours with Holly in his Cessna 185, which is the first airplane I ever flew. Holly was a terrific gentleman, and a good, and close, friend.
Panel work has progressed, as well. The left side floating panel and all of the overlays have been painted. I am not as happy as I might be with the paint, but I am running out of time. So it will have to do. During some succeeding winter I will probably pull things apart and re-do the panels ... again. At least I won't be distracted by all the other tasks I am currently undertaking.
You may recall I was originally going to have printed overlays done by PlacardsPlus. The decision to forgoe re-doing the lower panel (in retrospect, a wise decision) drastically reduced the amount of lettering necessary. I can handle the remaining lettering with a dry transfer process.
Once the lettering is complete I will overspray the panel and overlays with a clear, flat protective coat. Today will see the various screws and nuts associated with the panel and overlays painted and all of that will be ready to go back together.
The steel engine parts are on their way back to Dennis Toepke, along with the necessary bearings, gaskets, seals and new nut/bolt kits. I haven't heard back from the folks going over the case, except it is out of the welding shop. Which means (a) it needed some welding, and (b) progress is being made.
There is a lot of work to be done before the airplane will be back in the air. The baffling needs to be stripped and re-painted and the new seals installed. I haven't even ordered the new upholstery and carpet yet, nor have I started work on the interior trim plastic. Holiday activities have slowed me down some, but I need to keep rolling so the rest of the airplane will be ready when the overhauled engine arrives. Dennis hopes the engine will be ready to hang before the end of the year. Which means I need to break free from the computer and do something useful!
Wednesday, December 10, 2008
 The right side overlay is finished. Sort of. As I was thinking about it last night, I was not as happy with it as I might be. The opening for the ammeter is off by about 3/16" horizontally and vertically. The opening for the tach is off by about 1/16" vertically. The opening for the fuel and oil gauges could be about 3/16" larger vertically. So early this morning I was thinking I might abandon this idea and return to the stock Cessna plastic overlays. Looking at this photo now, I am inclined to continue with the aluminum overlay.
Even if I go back to the plastic overlays, I will not completely abandon this project. I could make a new right side overlay. There is only about $5 worth of aluminum here. But I am running out of time.
After I took this photo I removed the left side panel. All of the shock mounts are shot. Even if I decide to abandon the new overlay scheme, this disassembly has had value. Obviously, the shock mounts need to be replaced. I am also replacing the yoke grommets, which were seriously worn.
The changes to the filler overlays in the avionics stack are an unmitigated success. Those overlays are a very large improvement over what was there.
Wednesday, December 3, 2008

Friday, November 28, 2008
Friday Progress
 OK friends and neighbors, here are the basic components in the mount for the Bendix/King AV80R GPS. The aluminum is the overlay that fits just below the transponder. Right above it is the holder for the GPS provided in the box. To the right are the fasterners, a 6-32 x 1/2" screw, a #6 washer, a #6 lockwasher, another #6 washer and a #6 nut.
 The screw goes through the slot in the holder with a washer behind it to spread out the forces. The slot is exactly the width of a #6 screw, so I had to take a small file and widen the slot just a smidgen.
 This is the back side. Washer, lock washer, nut. Nothin' to it!
 And here is the trial fit. I think it is going to be pretty snazzy, once the panels are all painted a dark gray and everything is back together.
Wednesday, November 26, 2008
Right Side Panel
I just received word from my mechanic that the FAA is not doing field approvals at the moment. So, it is back to the original idea of a new cosmetic overlay on the right side panel.
Progress
Progress has been a little slow. I have had some projects around the castle that have needed my attention, coupled with a couple of bouts of laziness.
But I have tested the proposed location for the AV80R. It fits, and will look, great. Sorry, no pictures. I couldn't hold the unit with both hands and work the camera at the same time.
But I have tested the proposed location for the AV80R. It fits, and will look, great. Sorry, no pictures. I couldn't hold the unit with both hands and work the camera at the same time.

Work has started on replacing the baffle seals. As you can see from the above photo, the seals were well past the point of needing replacement. They appear to be the original seals. Which is too old by more than a few years.
 This is the seal kit that I ordered from Aircraft Spruce. It appears to be good quality material and the price was very reasonable. The kit includes the seals, two packages of rivets (it looks like way more than enough), washers, and a package of screws and nuts that I haven't figured out yet. Note that they even include an appropriately sized drill bit.
I worked on removing the old seals last night. It is fussy work drilling out the old rivets and pulling the old staples (yes, the factory STAPLED some of the seals in place). I worked until the battery on the drill gave out. I got about 2/3's of the rivets out.
A good deal of care is in order as the baffles are very light gauge aluminum and can be easily damaged.
I also got educated on the differences between "old design" and "new design" drive couplings for the alternator. I purchased a new drive coupling from Quality Aircraft Accessories. Who are, by the way, great folks with which to work. Those little puppies are $574 each with a $500 core charge. The bad news is that the "old design" coupling is not an acceptable core. It turns out that if the old design coupling fails, it tends to spread bits and pieces throughout the engine. So having the new design is a good thing. But $1,074 for that small part is more than slightly painful.
Wednesday, November 19, 2008
Panel Update
The fabrication of the new overlay for the right side panel is on hold. A couple of friends in the 150/152 club suggested that I fabricate a floating panel for the right side instead of just doing a new overlay.
This constitutes more than a cosmetic change. So, my mechanic is checking with the FAA on the possibility of doing a field approval.
This constitutes more than a cosmetic change. So, my mechanic is checking with the FAA on the possibility of doing a field approval.
Monday, November 17, 2008
Engine News
The mechanic has gotten the engine completely disassembled. I didn't need to worry about that one cylinder flange nut, or the stud or case. I broke one of the through-bolts. All of the studs, nuts and bolts get replaced anyway, so no harm done.
The case and the steel parts have been shipped off for inspection. The case will probably get line bored, in addition to new studs. We will see if the cam and/or crank need to be ground.
The case and the steel parts have been shipped off for inspection. The case will probably get line bored, in addition to new studs. We will see if the cam and/or crank need to be ground.
Overlay Progress
 The first trial fit for the right side overlay template is to make sure the mounting holes line up. If you look closely, you can see the layout lines for the round openings. The next step is to cut out the round openings and make sure they line up with the instruments. Once I am sure they are in the right places, I will cut the openings for the fuel and oil gauges.
 The center stack overlays fit perfectly! The blank area below the transponder will host the Bendix/King AV80R GPS.
 The center stack overlays have been drilled and are ready for a trial fit. The right panel overlay template has been cut out and the mounting hole locations drilled.
  You have to view these images from bottom to top. It is just the way the blog is set up. This is the panel as it looked Saturday morning.
  These are the overlay blanks ready for layout and drilling. The large one on the left is for the right side panel. The middle one fits below the transponder in the center stack, and the small one goes on top of the radio.
 Wednesday, November 12, 2008
Engine
The engine is in the hands of the mechanic. We (my Wife and I) hauled it up to Port Angeles on Saturday. It looks like a solid month before it will be ready to hang.
I have started pulling out cabin items. The instrument panel is pretty much disassembled, the seats are out, and I am about to pull out the ugly carpeting. But first, I will be fabricating a new overlay for the right side of the instrument panel.
The left side is easy. I will simply install new overlays on the existing, floating, instrument panel. But Cessna, for whatever reason, mounted all the right side instruments directly on the sub-panel, which is a structural part of the airplane. So, a new overlay is in order if the right side is to match the left side.
What fun!
Monday, November 3, 2008
Progess
I started work on removing the remaining three cylinders this past Saturday. I have had real problems with recalcitrant nuts.
I was hauling on one of the #2 cylinder flange nuts, and it seemed to break loose. Not so. I observed that the stud was turning, and not backing out. I couldn't pull it out either. This is not good.
The decision was made to leave the removal of the rest of the cylinders to the professional. I just may have caused myself more trouble than I bargained for. I will know for sure once the mechanic gets that cylinder off and lets me know if the damage I did is beyond repair ( $$$$ :( ).
I had a very positive experience with Aircraft Spruce last week. I got confused in ordering the spark plugs and ignition harness on-line, so I called. Mike was very helpful in guiding me through what I needed.
This evening will be spent cleaning parts, which I hate. But I hate paying a professional mechanic to do it even more. Sometime this week the intake tubes and the oil tank will get painted and everything will be ready to go up to the mechanic in Port Angeles. That is scheduled for next Saturday.
Tuesday, October 28, 2008
MAGNETOS
Aircraft Magneto Services in Seattle received my mags yesterday. They found them suitable for the 500-hour service, which they completed. They are shipping them back to me today. The price was reasonable, too.
That kind of service is a thing call "customer service", and these folks know all about it.
That kind of service is a thing call "customer service", and these folks know all about it.
Monday, October 27, 2008
Weekend Progress
Things are moving along. All of the accessories are off (photos to follow), the vacuum pump is off, the intake system has been removed, as well as the exhaust system, and the oil tank is draining in a bucket.
I have also gotten one cylinder off. Peering in the crankcase, things look pretty good. I don't see any signs of corrosion and there doesn't appear to be any pitting on the cam. I am crossing my fingers because the condition of the bottom end of the engine will have a major impact on the overall cost of the overhaul.
I had considerable help over the weekend. My buddy Dean showed up on Saturday and spent a good deal of time fetching wrenches, holding parts and asking lots of questions about aircraft engines. I enjoyed the company. On Sunday (yes, I skipped morning church) my hangar neighbor Brandon came over and helped get the oil tank off. Again, I enjoyed the company. The hangar can get kinda lonely sometimes.
There is a pause in parts ordering as I am changing banks. My aviation account has been at the same bank for quite some few years. I made the mistake of not completely understanding the bank's policy regarding out of character purchases. The bank made the mistake of offering something less than stellar customer service in the process of straightening it out. I am stuck with one foot on the boat and the other on the dock until the card comes from the new bank.
Thursday, October 23, 2008
Magnetos
I have learned a lot about Slick magnetos in the last couple of days. My hat goes off to Cliff at Aircraft Magneto Services. These folks are wonderful.
Of major importance is a word about low priced "exchange" Slick magnetos. "Exchange" Slicks are not overhauled, they are new. It is not cost-effective to overhaul the Slick mags. There was an AD issued recently on some Slick mags. If you are ordering exchange mags, be certain that the serial numbers are above 0808453.
If the price seems to be too good to be true, it probably is and you will need to deal with a rather inconvenient AD.
My mags are going off to Magneto Services, Inc. tomorrow for evaluation. Basically, if the impulse coupling is good, the mag is a good candidate for the 500-hour service. If not, then I will be shopping for new mags.
You can call Cliff at 206-768-3099. The company is located on Boeing Field (King County Airport) in Seattle.
Tuesday, October 21, 2008
The project is off to a flying (no pun intended) start. The magnetos and the carb have been removed, along with many small bits and pieces.
The next step is to ship the mags and carb off for overhaul.
A lot of parts have been ordered. I want to express my thanks to Chief Aviation in Grants Pass, OR., A.E.R.O., and Aircraft Spruce. These are great companies from whom I have received excellent customer service.
The next step is to ship the mags and carb off for overhaul.
A lot of parts have been ordered. I want to express my thanks to Chief Aviation in Grants Pass, OR., A.E.R.O., and Aircraft Spruce. These are great companies from whom I have received excellent customer service.
Sunday, October 19, 2008
Before
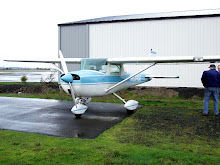
The following are the "before" photos. Just minutes before I started pulling things off the airplane. You can note that she is a pretty little bird. I like to say that she has a good "10-foot" paint job. It looks great from 10 feet. No exterior changes are contemplated, though I may remove the wheel pants. They look good, but they are a pain in the neck.
 As you can see, the plastic is in pretty good shape, though dirty and discolored. That will be fixed. You can also get a glimpse of the really ugly, and uncomfortable, seats. Shelby Isham at Tnwings will be helping with that.
 Again, the plastic is solid. Shelby will be helping with the ugly (and probably not acceptable to the FAA) carpet
 I have always liked the "G" model panel. It is reasonably simple, pretty well laid out, and pre-dates Cessna's need to "color coordinate". The color matched lower panels of later models can look really hideous. Especially on colors like yellow. The yokes are in good shape. I had thought of getting leather yoke covers, but they don't need it. The push-to-talk switch arrangement will be getting fixed.
 I am going to retain Placards Plus to do new overlays for the panel. This will eliminate the Cessna plastic overlays and the panel will resemble the newer Cessna panels that do not have the plastic overlays. I am also going to slightly modify the lower middle panel by lowering the intercom to align it with the avionics master switch and the radio's circuit breakers. That will leave a space to mount the Bendix/King AV80R I have on order.

Subscribe to:
Comments (Atom)